Explore Slab Leak Pros
(714) 555-0148Demo number · does not receive calls
Slab Leak Pros / Placentia, CA

Slab Leak Repair in Placentia, CA

A warm floor. A rising water bill. A leak you cannot see. Start with a clear understanding of the source, then compare a targeted repair, a new pipe route, or repiping. We make those choices easier to understand before you decide what happens to your home.

Demo number · does not receive calls

Focused on Placentia homes in 92870, including Woodfield, Old Town Placentia, Atwood, and Alta Vista South.

  • Diagnosis before decisions
  • Clear repair choices
  • Placentia-focused guidance
Illustrated home cutaway showing a water pipe beneath a concrete slab.
Find the source firstA wet spot is only a clue.
Know your optionsRepair. Reroute. Repipe.

Original schematic · not a property survey

A clearer starting point

What does slab leak repair actually involve?

Slab leak repair addresses a leaking pipe beneath a concrete floor or foundation. The first task is to confirm which line is leaking and where it runs. Depending on the findings, the repair may replace a short damaged section, bypass one buried line, or replace a wider set of supply pipes.

A wet floor alone does not prove the problem is below the slab. Water can travel from a wall, fixture, appliance, or drain before it becomes visible. A careful inspection checks those possibilities before anyone proposes cutting concrete.

For a Placentia homeowner, the right choice also depends on access. An attached home may need a coordinated shutoff. A finished garage can change the route of replacement pipe. A difficult-to-match floor can make the restoration plan as important as the plumbing work itself.

Different problems. Different paths.

Which repair option fits your home?

A repair should follow the findings. These six starting points cover the ten service topics in our Placentia guide.

Start with the source

Slab leak detection narrows the problem before a repair method is chosen. Testing may separate the hot and cold supply, trace the line, and compare sound or moisture clues. Ask what was confirmed, what remains uncertain, and how the marked location relates to the proposed opening. A precise finding is more useful than a guess based on the wettest tile.

Check the clues

When water will not wait

Consider emergency slab leak repair when water is actively spreading or a supply line cannot remain on safely. The immediate priority is control and assessment. Describe the visible water, whether a safe shutoff is available, and any access limits. Confirm actual availability directly; an urgent problem does not make an unverified arrival promise reliable.

Check the clues

Hot or cold changes the search

A persistent warm patch may justify hot water slab leak repair testing. A cool wet area can lead toward cold water slab leak repair, but temperature alone cannot identify the line. Explain whether the symptom changes after showers, laundry, or periods when no one uses water. That timing helps frame the inspection.

Check the clues

A repair at the damaged section

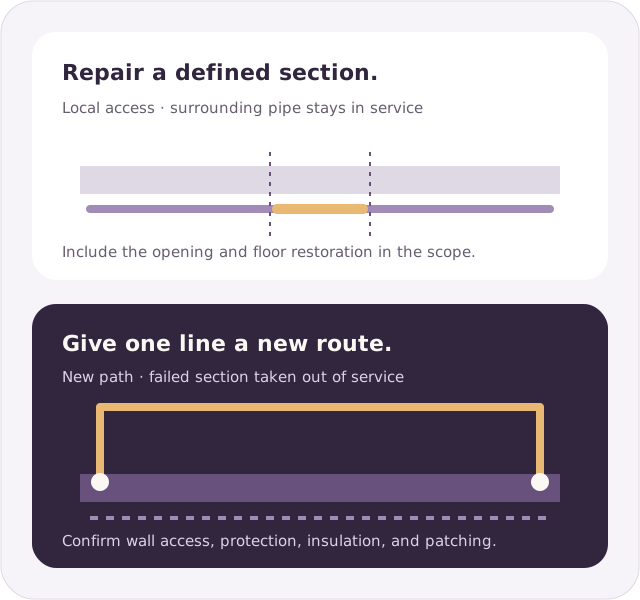
Slab leak spot repair replaces a limited section through a planned access opening. It may fit an isolated defect when the surrounding line is suitable to keep. For confirmed copper damage, copper pinhole leak repair should also consider the condition of nearby pipe. Ask how the slab and finished floor will be restored.

Compare the approaches

A new path for one problem line

A slab leak reroute bypasses a failed section with a new route through suitable accessible spaces. The old line is taken out of service. This can reduce floor disturbance, but it may require wall or ceiling openings. Compare the full route, insulation, protection, and patching scope rather than judging only by the absence of concrete cutting.

Compare the approaches
Follow the evidence

What are you noticing at home?

Open the closest match. These clues help you describe the problem; none confirms a slab leak on its own.

A warm patch that keeps returning

Note where the warmth appears and whether it stays when hot water has not been used. Sunlight, heating, and nearby equipment can also warm a floor. Combine this clue with water-use evidence rather than treating it as a diagnosis.

Explore hot-line testing
Water use rises without a clear reason

Check the billing period and recent irrigation or household changes. Then consider visible fixtures and appliances. A meter can show unexplained flow, but it cannot tell you whether the leak is under the slab, outdoors, or at a toilet.

Understand leak detection
Flooring becomes damp or starts lifting

Photograph the affected edge and note when it changed. Moisture can move beneath a finish, so the visible patch may be away from the source. Do not pull up flooring or drill into the slab just to look for water.

Read about supply leaks
Odor or dampness follows drain use

Tell the person inspecting the home which fixture was used before the symptom appeared. A wastewater problem calls for different testing from a pressurized supply leak. Avoid contact with suspect wastewater and keep children and pets away from the affected area.

Explore drain-leak checks
Beneath the surface

How is a hidden leak found and repaired?

The useful sequence is simple: establish the source, compare access, agree on the scope, then verify the result. The details depend on the home.

Why can a buried pipe begin to leak?

A pipe can fail at a joint or develop damage along its wall. Copper can develop localized corrosion called pitting, which can eventually make a small hole. Installation conditions and water chemistry can contribute to corrosion, but a neighborhood name is not enough to assign a cause. The Copper Development Association handbook explains why system design and operating conditions matter.

Previous repairs also matter. A home may contain a mix of original and replacement lines. Ask where earlier leaks occurred and whether the same branch has failed more than once. That history supports a better repair comparison; the building's age alone does not prove its pipe material or remaining condition.

What does the testing actually show?

The inspection starts with accessible fixtures, the meter, and the home's layout. Isolating a section means separating it from other parts of the system for testing. A pressure test can help determine whether that section holds pressure. Acoustic equipment listens for sound associated with escaping water. Its usefulness depends on pipe material, access, background noise, and the conditions of the leak.

A thermal camera shows surface temperature patterns. It does not see through concrete or directly reveal a hole in a pipe. FLIR's explanation of thermal leak detection describes this limit. Moisture readings and other findings should support the interpretation. Drain investigations may use a camera where access and pipe conditions allow.

Three inspection steps: observe the clue, isolate the line, and confirm the source.
Several clues. One evidence-based decision.

How do you choose between opening and bypassing?

A spot repair keeps most of the existing line and opens a defined area to reach the damage. A reroute replaces the path of one affected line. Repiping addresses a larger supply network. Each has a different balance of plumbing work, access, and finish repair. Ask to see those differences in writing, with the rooms and surfaces affected by each option.

Before concrete is cut, the slab's construction and any embedded hazards need review. A post-tension slab contains stressed steel tendons; cutting into them can be dangerous. Do not assume a particular foundation type from a home's age or appearance. Ask how the work area will be assessed and what scanning or specialist input the proposed access requires.

What happens after the pipe work?

The repaired or replacement line should be tested before the access is closed. Ask which checks will document that the repair holds and fixtures operate correctly. For a reroute, the record should identify the new path and the abandoned line. Keep photographs, findings, and the completed scope with your household records for future maintenance.

Stopping the leak and restoring a dry room are separate tasks. Wet materials need assessment before they are covered again. Agree on who handles drying, concrete patching, wall repair, paint, and floor replacement. Ask whether these items are included or separately arranged. That conversation helps prevent a finished plumbing repair from leaving an unfinished room.


Comparison of repairing one buried pipe section and rerouting a line above the floor.
Illustrative routes; the actual design is home-specific.
A practical sequence

What should a repair plan include?

Use three checkpoints to keep the work understandable from the first inspection to the final walkthrough.

  1. Confirm the problem

    Describe the symptom, check accessible sources, and establish which system is involved. Ask for the inspection findings and any remaining uncertainty. Agree on the next test before moving from diagnosis to a destructive opening.

  2. Define the work

    Compare suitable repair methods, access points, shutoff needs, and finish repairs. Clarify permits, responsibility for approvals, and what happens if concealed conditions change the scope. The written proposal should make exclusions as clear as the included work.

  3. Verify and restore

    Review testing before the opening is closed. Confirm the fixtures work, collect repair records, and inspect the agreed restoration. Continue to watch the original symptom and water-use trend; a dry surface alone does not document the condition of hidden materials.

Act on the evidence

What can waiting make harder?

An active leak can keep adding water to areas that are difficult to see. Flooring, wall bases, stored belongings, and adjacent rooms may become involved. A hot-water supply leak can also waste energy used to heat the escaping water. The extent depends on the source and how long it remains active.

A small visible patch does not measure the full amount of moisture. Water may spread under a finish or collect out of view. Document changes and seek an assessment when the source is unclear. Avoid covering a damp area with new flooring or paint before the cause and moisture condition are addressed.

The EPA's moisture guidance emphasizes drying water-damaged areas and items within 24–48 hours to help prevent mold growth. This is a reason to act promptly, not a prediction that every leak causes mold or structural damage.

Know what the quote covers

What affects slab leak repair cost in Placentia?

A useful estimate separates diagnosis, pipe work, access, and restoration. A single total is hard to compare when those boundaries are missing.

Cost drivers to discuss before approving work
Finding the sourceThe affected system, access to test points, and complexity of tracing the line determine the investigation needed.
Reaching the pipeConcrete access, cabinets, finished flooring, wall openings, and the route to the work area can change the labor involved.
Extent of replacementOne damaged section, one rerouted branch, and a broader repipe are different jobs. Compare matching scopes.
Restoring the roomDrying, patching, paint, and matching finishes should be itemized. Confirm what the plumbing price leaves out.
Coordination and approvalsShared shutoffs, association access, required permits, and inspection scheduling can affect the work sequence.

Who handles permits and the water supply?

For ordinary residential plumbing within the city, start with Placentia Building and Safety to confirm the requirements for the proposed scope. Ask who will obtain any required permit and arrange inspections. An association approval and a city permit address different questions; one does not replace the other.

The city's New Resident Guide lists Golden State Water for most residential customers and Yorba Linda Water District for a smaller portion. Check the actual bill for your address. A Placentia ZIP code or neighborhood name is not enough to assign your supplier or authorize work on utility equipment.

A local lens

What should homeowners in your Placentia area consider?

Our neighborhood guides focus on repair decisions, access, and questions to ask. The specific property—not the community name—determines the plumbing work.

Woodfield

In Woodfield, attached townhome layouts make access planning important. Identify the affected line and ask whether the proposed route involves a garage, shared wall, or exterior area before deciding who must approve the work.

Cinnamon Tree

For Cinnamon Tree, the floor level is a useful first detail. Dampness in an upstairs condominium should not be assumed to come from a slab. Confirm the unit, accessible shutoff, and any need to coordinate entry.

Granada Park

A repair discussion in Granada Park should compare floor access with a feasible bypass. Arrange gated entry and include floor restoration in the scope. The presence of an association does not by itself establish who pays.

Placentia Village Groves

In Placentia Village Groves, check the current association process if a new pipe route changes an exterior surface. Discuss staging and access early, and keep designated fire lanes clear while equipment and materials are brought to the home.

Placentia Lakes

For Placentia Lakes, distinguish domestic pipe symptoms from irrigation or decorative landscape water. Start with testing that identifies the affected system. A nearby pond or stream is not evidence that water beneath a home comes from plumbing.

Corte Vista Villas

In Corte Vista Villas, discuss where equipment can be staged and how workers will reach the opening. Compact access can affect the plan. Confirm the actual building layout rather than relying on a listing’s ownership description.

Northpoint at Alta Vista

For Northpoint at Alta Vista, one- and two-story layouts can offer different replacement routes. Identify the fixtures served by the leaking branch and ask which garage, wall, or ceiling surfaces would need to be opened and patched.

Old Town Placentia

In Old Town Placentia, the building’s actual use and foundation need attention before assuming a slab leak. Clarify whether the line serves a residence, an upstairs space, or more than one occupancy, then plan access around that finding.

Atwood

For Atwood, small-lot access makes the work area worth discussing before a repair is chosen. Note previous additions or plumbing changes if known. Line tracing should guide the comparison between targeted access and a replacement route.

La Jolla

When asking about La Jolla, give the full Placentia address to avoid confusion with other places of the same name. Describe the water source clues first. Confirm the home’s actual layout and supplier from its own records.

Altura

In Altura, condominium ownership does not establish whether a particular pipe is shared. Confirm the unit’s plumbing arrangement and the approvals needed for the proposed route. Arrange gated access before an inspection appointment.

Bella Vista on the Green

For Bella Vista on the Green, clarify entry arrangements and any association requirements before work begins. Detached-home appearance does not settle responsibility for buried lines. Ask for the proposed pipe route and restoration boundaries to be marked clearly.

Alta Vista South

In Alta Vista South, compare replacement access with the fixtures that need service. The construction period alone cannot confirm pipe material. Ask how the proposed work would affect finished rooms, water availability, and the final patching scope.

Hamptons on the Green

For Hamptons on the Green, a home with several bathrooms may need careful tracing of the hot-water branch. Identify which fixtures lose service during the work. Compare the number of openings as well as the length of new pipe.

Mariposa Lane

In Mariposa Lane, plan gated entry and access from the garage to the affected fixtures. Confirm any association approvals before an exterior change. Keep the pipe repair and the room-restoration responsibilities clear in the written scope.

A more useful conversation

How can Slab Leak Pros help you prepare for a repair call?

We make slab leak repair in Placentia easier to understand by putting the symptoms, repair choices, and scope questions in one place. Start with what you can observe: where the water appears, when you noticed it, and whether the water is safely off. You do not need to name the failed pipe before seeking help.

Use our guide to ask for a clear next step. Establish whether the visit is for diagnosis, repair, or both. Confirm the inspection charge, availability, and who will perform the work. Before authorizing a repair, ask for the findings and written scope rather than relying on a general description given over the phone.

We keep the focus on practical decisions: the reason for the proposed method, the surfaces it affects, and the testing afterward. We do not use unverified review scores or a single starting price to replace those details. The goal is a repair conversation you can follow and a proposal you can compare.

This preview uses a fictional phone number. It does not accept service requests. Confirm service arrangements and read the site’s terms before using a future working contact number.

Straightforward answers

What else should you know before choosing a repair?

These are common planning questions. The inspection findings should guide the answer for your particular home.

For a simple water-use check, see the EPA’s household leak checklist.

Does a warm floor always mean a slab leak?

No. A warm floor can have other causes, including sun exposure or nearby heating. A persistent patch becomes more useful evidence when it appears with unexplained water use or other symptoms. Testing needs to identify the affected line before the floor is opened or a repair is selected.

Can I check my water meter before an inspection?

If the meter is safely accessible and serves only your home, record it while all water use is off. Include irrigation and automatic appliances. Compare readings after a no-use period. Movement suggests water is passing the meter, but it does not locate the leak. Shared meters need coordinated interpretation.

Will a slab leak repair require breaking the floor?

Sometimes. A spot repair needs access to the damaged pipe, often through a planned opening. A reroute may use a different path and reduce floor disturbance. The choice depends on the leak location, pipe condition, and feasible routes. Ask about wall and ceiling repairs as well as the floor.

Is a reroute the same as whole house repiping?

No. A reroute generally bypasses a particular failed line or section. Whole house repiping replaces a broader set of supply pipes. Ask which fixtures and branches are included in each proposal. A larger project should have a clear reason and a scope that matches the condition found in the home.

Can a drain leak look like a water supply leak?

Yes. Both can create dampness, but the systems behave differently. Supply piping carries water under pressure. Drain piping carries wastewater when fixtures discharge. Describe whether symptoms follow sink, shower, or laundry use. That timing can help plan testing, although it does not prove which system is leaking.

How long will the water need to be off?

There is no reliable duration without knowing the work. Diagnosis, one branch repair, and a wider repipe can have different shutoff needs. Ask which fixtures will be unavailable, whether service can be restored between stages, and what may change the schedule. Shared buildings may require additional coordination.

Do all Placentia homes use the same water supplier?

No. The city lists Golden State Water and Yorba Linda Water District among residential suppliers. Use your current bill to identify the utility for your address. Confirm which valve belongs to the home before operating it, and ask the utility or building manager about unfamiliar or shared equipment.

Does my HOA automatically cover a buried pipe?

Do not assume that it does. Responsibility depends on the affected pipe, the property documents, and the specific circumstances. Identify the line and ask the association to clarify any required authorization. Arrange access and shutoff coordination before work that could affect another unit or a common area.

Should drying wait until every finish is repaired?

No. Moisture assessment and appropriate drying belong in the response plan, alongside fixing the source. Materials should not be covered while their condition remains uncertain. Ask who will assess the wet area, what needs removal, and how readiness for restoration will be confirmed. Wastewater contamination needs a different cleanup approach.

What should I receive when the repair is complete?

Keep the final invoice, repair description, photographs, and any applicable permit or inspection records. Ask for the test results and written warranty terms if a warranty is offered. Confirm what remains to be restored and who handles it. Save the new pipe route with your home records for future work.

Clarity from the ground up

Start with the source. Plan the next step.

Use the symptom notes and call checklist to describe what is happening in your Placentia home. A clear diagnosis and a written repair scope give you a stronger basis for choosing the work.

Review what to have ready
(714) 555-0148Demo number · does not receive calls